So Friday night I was sitting at home, wondering what I was going to do with myself this weekend, and then I remembered! Hey, why don't I make a chekere? There are instructions on how to make them on the internet, and they don't seem that intimidating. The chekere I'm playing now was made by master artisan Jenny Fuss, who made all of Emeryville Taiko's drums plus a slew (sp?) of taiko stands and other taiko essentials--and not just for E'ville. I'd considered asking her if she had any chekere for sale, but I wanted to take this challenge on. I'm all for supporting artists, especially local ones, but she is my inspiration and chekere role-model, so maybe one day I too can have as much craftiness as she has in her little finger. It's gotta start somewhere, with something, right? Anyhow, there are basically just a few steps:
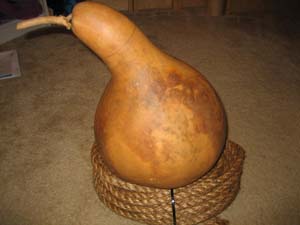
1. Get a gourd. Gourds can be found on the internet (I bought a couple online, but they weren't quite what I wanted as far as shape went--every gourd is different) and you can also find them in some stores. I went to the Caning Shop in Berkeley. They have a friendly staff, but I think they were a little low on inventory (the time of year, I think). You can get gourds two ways: dried, or uh, undried. Undried gourds require you to store them somewhere for several months while they dry out and accumulate mold and gook. All the gross stuff washes off, but eh, I'm impatient, so I opted for the already-dried gourd:

Look at the pretty markings on the skin. I think that's from the mold. But then, I wouldn't know first hand since I'm lazy.
1. Get a gourd. Gourds can be found on the internet (I bought a couple online, but they weren't quite what I wanted as far as shape went--every gourd is different) and you can also find them in some stores. I went to the Caning Shop in Berkeley. They have a friendly staff, but I think they were a little low on inventory (the time of year, I think). You can get gourds two ways: dried, or uh, undried. Undried gourds require you to store them somewhere for several months while they dry out and accumulate mold and gook. All the gross stuff washes off, but eh, I'm impatient, so I opted for the already-dried gourd:

Look at the pretty markings on the skin. I think that's from the mold. But then, I wouldn't know first hand since I'm lazy.
Step 2. Cut the top off and clean out the insides. This is the step I'm on right now.

I got a gourd with a narrower neck since that is what I'm used to playing, but I can't fit my hand in there. On the internet everyone said that how they cleaned out the gourds is to use whatever you've got: bent coat hangers, spoons, grapfruit knives, old drumsticks, whatever. I got the mass of seeds and other gourd linings out, but there is a layer of other stuff in there--kind of like when you peel an orange, and there's the white membrane still stuck to the fruit. Anyhow, it's hard to scrape off. I tried coathangers and stuff, but it's too far in there, so I had to stop. My tools were blunt and uncivilized:

I showed this pic to a friend of mine and she said, ooh, that's a scary picture. And then I was like, yeah, that's probably what the gourd is thinking too! Luckily, there are people out there who are crazy about gourds and gourd crafting, and I went to a website that supplied all the paraphanalia of gourd-addiction. They've not only got gourds, but dyes and wood burning tools and cutting tools and scraping tools and just about everything you could want. Since I've got a power drill, I opted for the gourd-inside-cleaning-out tool. Basically it looks like an abrasive ball on a long drill bit. It oughta do the job, but I have to wait a couple days for it to come.
More updates on step 2 when I get the bit. And then on to step 3: dying, and then the dreaded step 4: beading. Step 5: Playing has already been well documented.


No comments:
Post a Comment